User Manual
GUI usage
Upon accessing the Mobile Measurement System (MMS), the main page shows an overview of its functions, a quick start guide, and general tips for using the MMS. More detailed information can be found in the corresponding sections of the user manual.
Setup
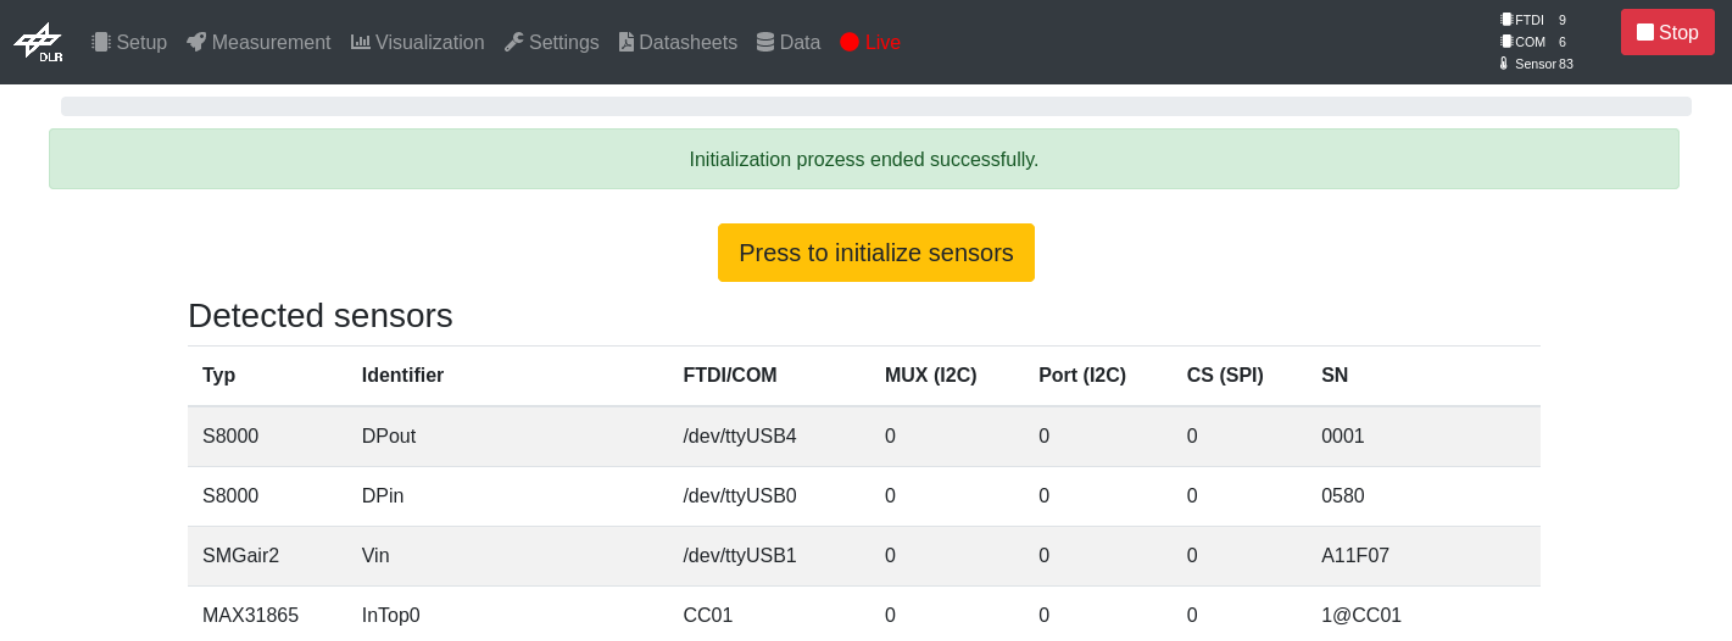
Connect all FTDI and sensors and make sure all FTDI have a distinct identifier. If two FTDI have the same identifier sensors cannot be identified correctly. See rename FTDI in the hardware documentation to adjust FTDI identifiers. Start the sensor initialization by either using the button press to initialize in the center of the screen. If all sensors were detected correctly a green message “Initialization process ended successfully” A list with all detected sensors and their relevant information will be shown. The sensor types and their corresponding serial number are listed together with the associated ports and FTDI. You can assign names for each sensor via the Add name button in the “Identifier” column. For more detailed sensor settings navigate to the Settings Page in the main menu at the top and choose the Sensors tab (see Settings/Sensor part of this user manual). After setting up the sensors, the measurement can be started with the Start button in the top right corner. If the measurement was started successfully, the button changes to Stop with which the measurement can be stopped.
Measurement
Provides the option to schedule a measurement. After choosing a title, a starting time and the measurement duration, the measurement can be scheduled via the Schedule button at the bottom.
Visualization
Provides the option to visualize measurement data for each sensor. View live data or select the desired data by choosing the measurement ID under Selected run at the top. Each shown graph can be moved and resized with the corresponding anchors. The Measurement Info button in the top left corner provides a quick overview of relevant measurement information like ID and start/stop time. The measurement periods can be adjusted via the Settings Button in the top right corner. The Download button in the top right corner exports the measurement data in the desired export format.
Data Sheets
Holds all data sheets of devices the MMS has been tested with.
Settings
Provides various settings for the MMS in the respective tab.
Sensors
Detailed sensor information and settings. Provides the option to configure each sensor. Identifier, position and color can be assigned individually for each sensor and saved with the Save button at the bottom right. Additionally, you can choose which quantities shall be displayed in the visualization menu (at least 1). The current sensor configuration can be stored via the Download config button in the bottom right corner. Other sensor configurations can be uploaded and used by choosing the configuration file and uploading it with the Upload config button in the bottom right corner. Delete all or only disconnected sensor with the respective buttons Delete all and Delete disconnected at the bottom left side. You will need confirm your request for deletion.
Data
Shows information for all conducted measurements and remaining disk space. Here individual measurement data can be exported and stored or deleted. Choose the desired file format in the “Store” column to export the measurement data. Deletion of specific or all measurement data can be performed with the respective Delete button in the “Delete” column or by using the Delete all button in the bottom left corner.
General
This section allows to set hardware configuration the system cannot detect on its own, to manipulate the user interface and data acquisition and visualization. For details see the field description in the user manual. All fields can also be access via /api/measurement.
Log
Shows last 100 system log entries with corresponding time stamps and actions. Provides the option to view additional log entries or to reset the log.
System
Holds information of the host system and the current software revision.
About
Shows relevant MMS development information with the option to view the git repository and report issues.
Data
Refers to Settings/Data tab. Shows information for all measurement in the database (See Settings/Data).
Live
Displays live measurement data and only shows during a measurement. For each quantity that can be measured by the present sensors a table is generated. Each row in these tables correspond to the measurement values of a single sensor. The table height can be manipulated in the Settings/General. Using the check boxes on the right of each row enables an ad-hoc averaging of multiple rows. Additionally, minimum and maximum values are computed and display at the bottom of the table.
API Examples
A growing list of code snippets illustrating how to communicate
with the web api is given in the examples/ directory at the
repository root. Essential calls are presented in a condensed fashion below.
Start/Stop a measurement
>>> import requests
>>> # System url
>>> url = "http://192.168.4.1"
>>> # Start measurement
>>> requests.post(url + "/api/quick", {"quick": "start"})
>>> # Stop measurement
>>> requests.post(url + "/api/quick", {"quick": "stop"})
Fetch live data
>>> import requests
>>> url = "http://localhost:4444/"
>>> requests.get(url+"api/last/current/10").json()
Download most recent measurement data
A more complex update script is included in the examples and has been proven useful in stressful measurement environments.
>>> import requests
>>> url = "http://localhost:4444/"
>>> file_format = "csv"
>>> # Get most recent measurement id
>>> measurement_id = requests.get(url + "api/measurement").json()[-1]["result_id"]
>>> # Get CSRF token
>>> s = requests.Session()
>>> csrf_token = s.get(url).cookies["csrftoken"]
>>> # Request and store data
>>> payload = {"save": f"{measurement_id}_{file_format}", "csrfmiddlewaretoken": csrf_token}
>>> resp = s.post(url + "settings/", data=payload, verify=False)
>>> open("out.zip", "wb").write(resp.content)
MQTT Client
The mobile measurement system supports a MQTT client. If a broker is configured in the settings, all changes or extensions to the database will result in a message sent to the broker. The quality of service (QoS) is currently hardcoded and set to 0. Encrypted communication or authentication is not yet supported. QoS adjustments and the support of login credentials will be part of future versions.